Phoenix Cleaning Instructions

CLEANING INSTRUCTIONS

Rev. A 7/6/17
Document Overview
The purpose for this document is to outline specific details needed for the proper completion of preventative maintenance cleaning.
Scope
The scope of this document is to define and layout all instructions in sequential order for the completion of the preventative maintenance cleaning process. It is the responsibility of the technician performing this procedure to follow the steps, instructions and inspection requirements as stated in this document.
Required Equipment, Tools and Supplies
Special Note:
**NEVER USE OILS OR SILICON SPRAY ON THE PRINTER**
**Before proceeding with these cleaning instructions please disconnect all power and I/O connections from the printer before starting.
Cleaning Instructions
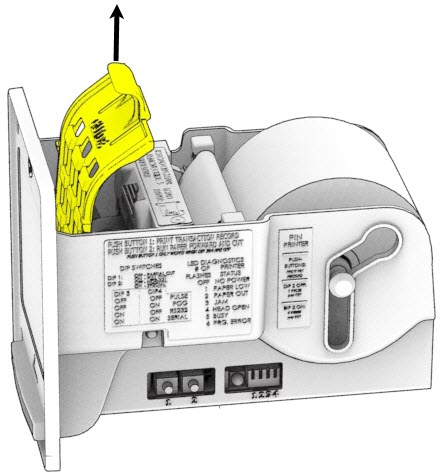
Step 1:
Remove the clear plastic paper guide from the printer as seen in the image below.
Step 2:
With the plastic guide removed you can now pull the release latch, swing the head open and remove the installed paper from the feed path.

Step 3:
With the cutter head fully open and paper removed you can now begin to blow out all areas using your canned air for any paper debris or dust removal. Please see images below for key areas.
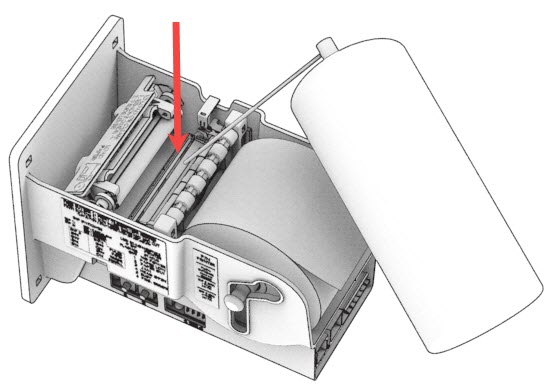


Step 4:
Now that all debris has been cleared with the cutter head open and using the Thermal Printer cleaning pen proceed to clean the thermal printing area for any residual residue that may be present as seen in the image below.

Step 5:
Now that all cleaning has been complete finish by closing the cutter head and reinstall the plastic paper guide. With the printer assembled please note to inspect the following inspection area for any obstructions that could be present in the paper exiting area as seen in the image below.


Related Articles
Apex 7000 Cleaning instructions
CLEANING INSTRUCTIONS www.pyramidacceptors.com Rev. A 6/27/17 Document Overview The purpose for this document is to outline specific details needed for the proper completion of preventative maintenance cleaning. Scope The scope of this document is to ...Phoenix Firmware Update Instructions
PHOENIX FIRMWARE UPDATE INSTRUCTIONS www.pyramidacceptors.com Rev. A 02/06/2023 Document Overview The purpose of this document is to outline specific details needed for the proper completion of Firmware updating utilizing our Phoenix tools program. ...Phoenix / Banilla Game, Serial Printer Configuration Instructions
The Phoenix thermal printer is now fully compatible with all Banilla game platforms via serial communication. Our new SEN02 firmware gives you full serial compatibility with a few extra advantages. Larger bold text, shorter ticket length to conserve ...Phoenix Configuration File Loading Instructions
Using an attached configuration file needed specific to your game terminal application please download it and save it to the desktop Windows PC. Once you have that done please follow the steps detailed below using the installed Phoenix tools program ...Apex 7000 Firmware Update Instructions
APEX 7000 FIRMWARE UPDATE INSTRUCTIONS www.pyramidacceptors.com Rev. A 10/30/2024 Document Overview The purpose of this document is to outline specific details needed for proper firmware updates of an Apex stacker bill acceptor. This document should ...