Apex 7000 Cleaning instructions

CLEANING INSTRUCTIONS

Rev. A 6/27/17
Document Overview
The purpose for this document is to outline specific details needed for the proper completion of preventative maintenance cleaning.
Scope
The scope of this document is to define and layout all instructions in sequential order for the completion of the preventative maintenance cleaning process. It is the responsibility of the technician performing this procedure to follow the steps, instructions and inspection requirements as stated in this document.
Required Equipment, Tools and Supplies
Special Note:
**We currently do not recommend a cleaning card for the bill acceptor at this time.
These cards can leave debris behind that can and will cause further issues if used.
**NEVER USE OILS OR SILICON SPRAY ON THE ACCEPTOR**
**Before proceeding with these cleaning instructions please disconnect all power and I/O connections from the validator before starting.
Cleaning Instructions
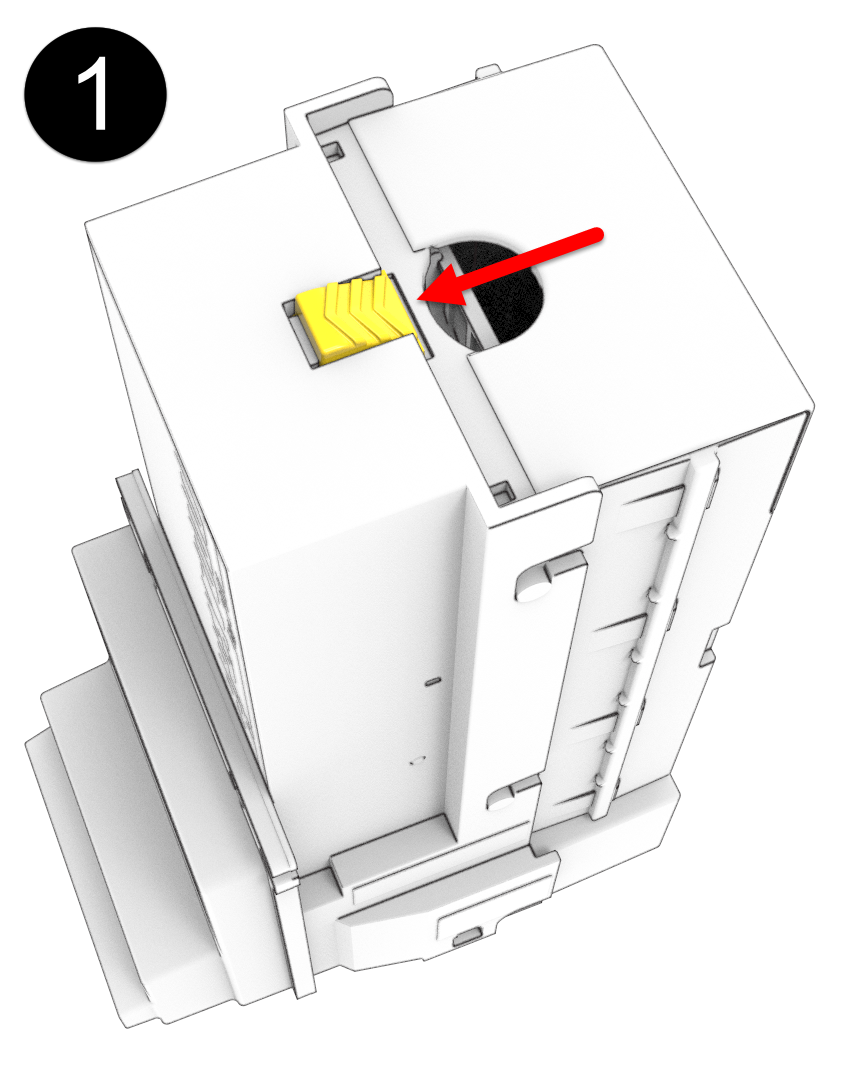
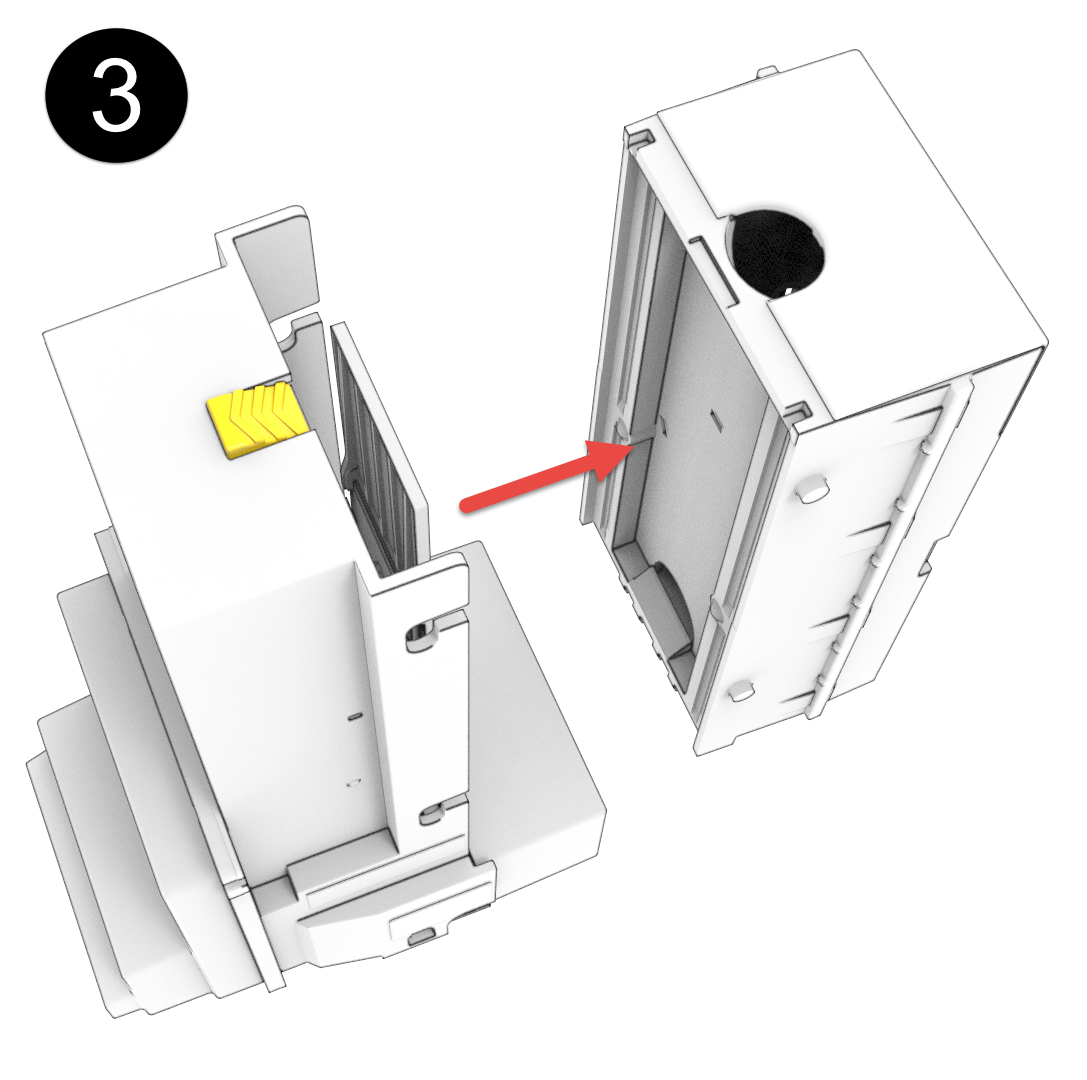
Step 1: Remove the cash box from the unit being serviced as instructed below:
Depress the cash box latch by pulling it towards the front of the bill acceptor.
With the latch depressed slide the cash box up.
Now with the cash box slid up you can remove by pulling it out away from the validator.
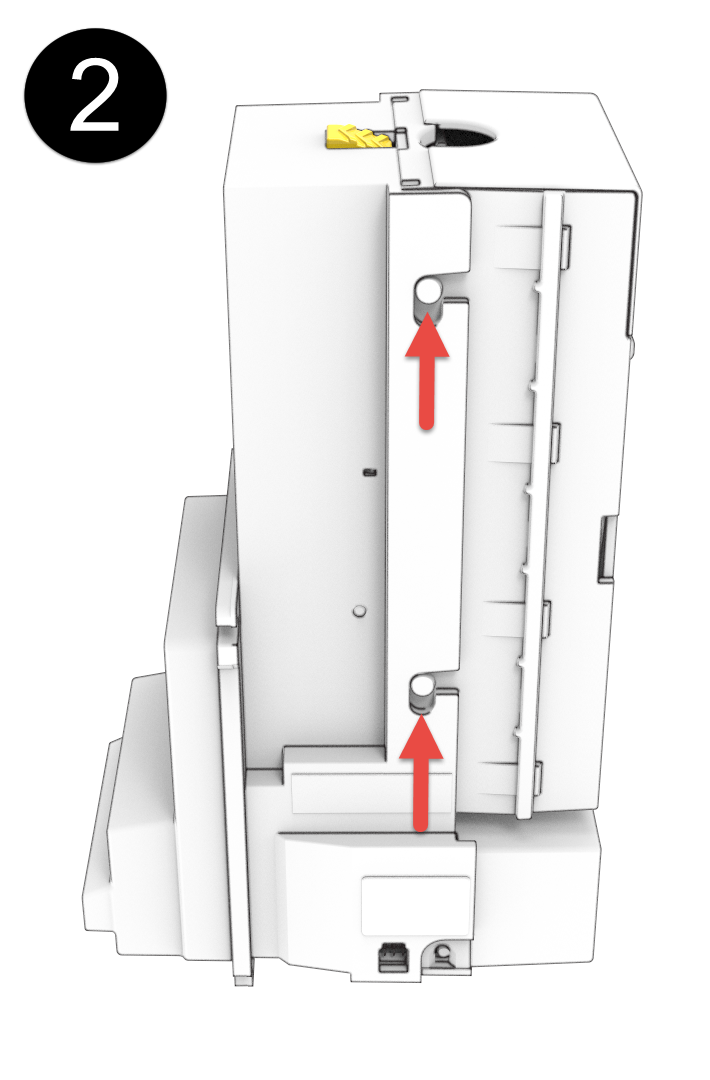
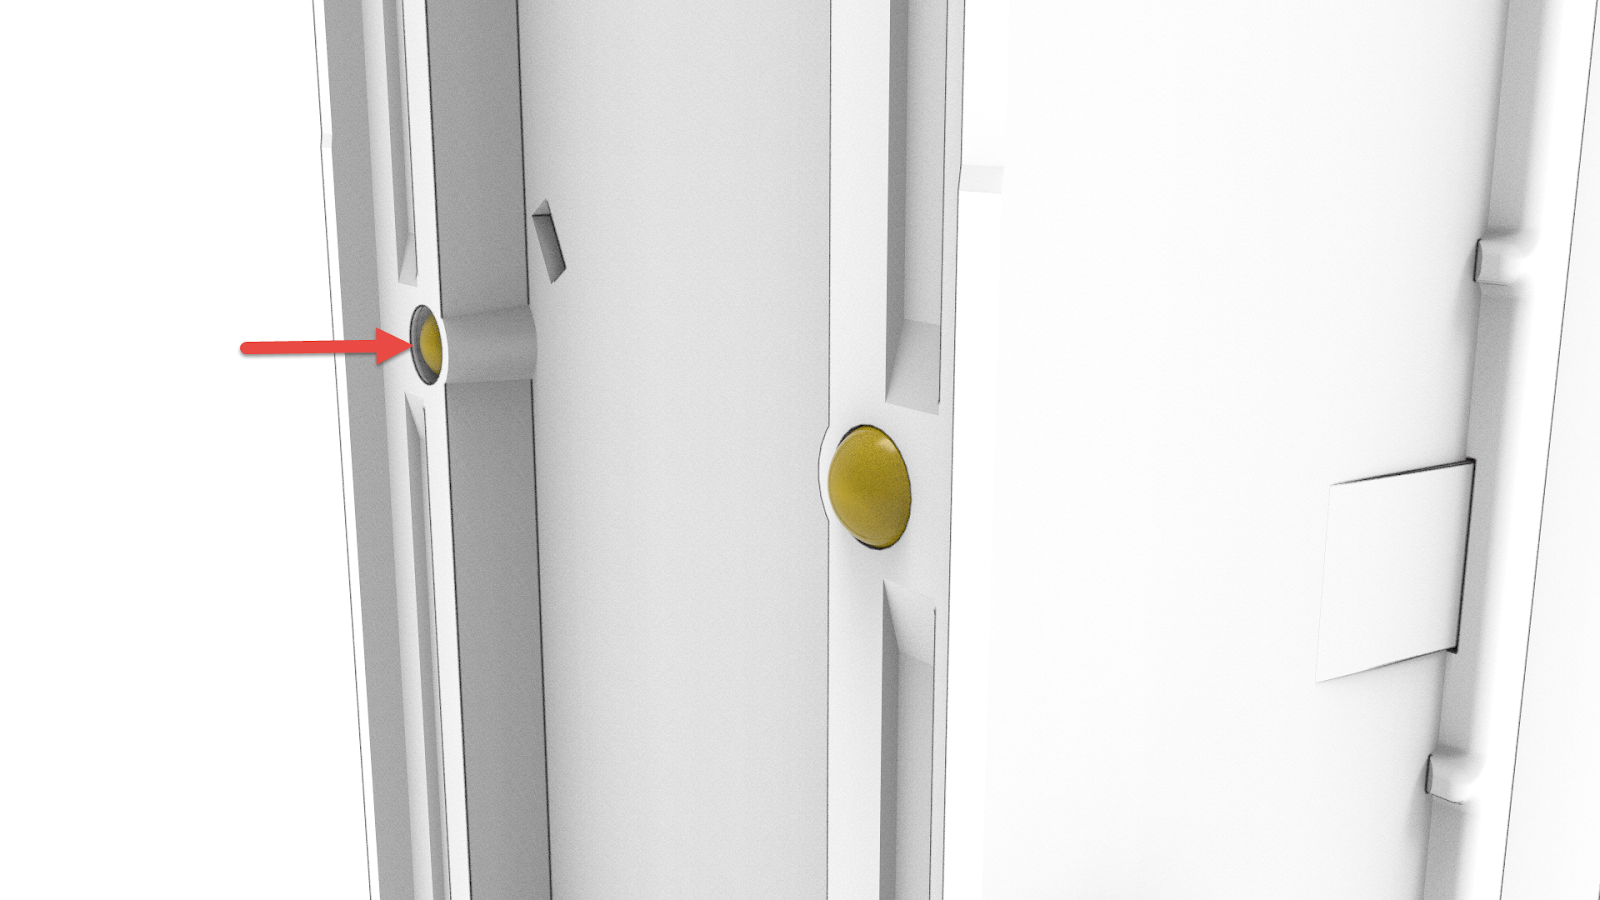
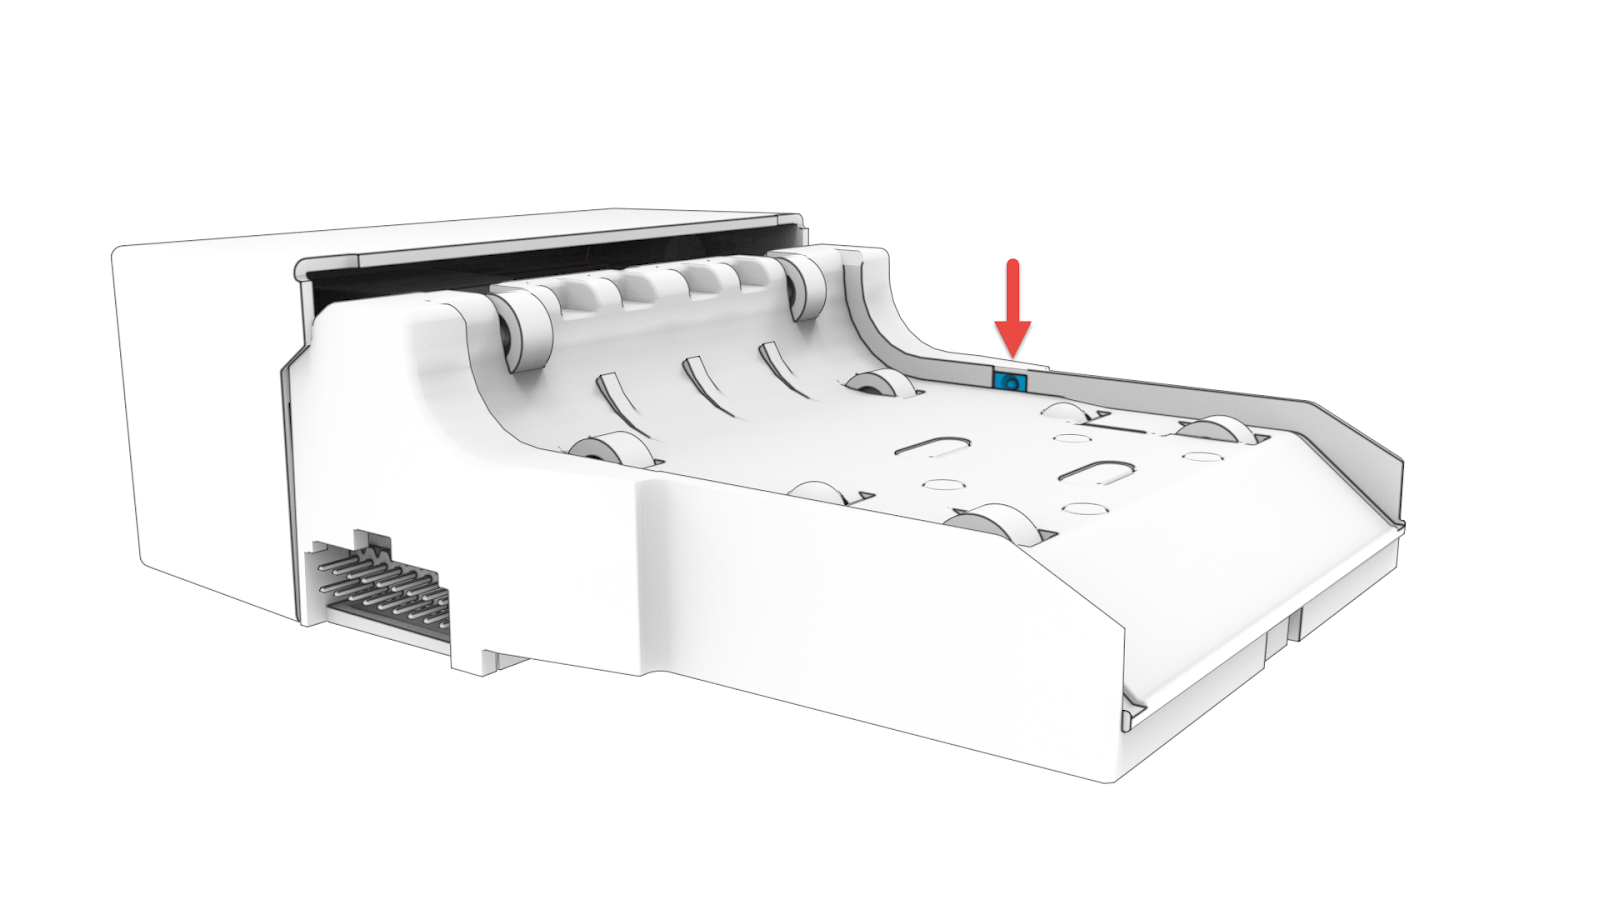
Step 2: With the cash box removed locate the two white plastic ball bearings located on the face of the cash box pointed in towards the validator when installed. There is one bearing on each side of the plastic frame. These plastic ball bearings can get fouled with lint, paper, dust and dirt. Clean if any is present as this can cause the bearings to not make full contact with the bill or completely stop it from moving.
Please see below for further identification and detailed instructions.
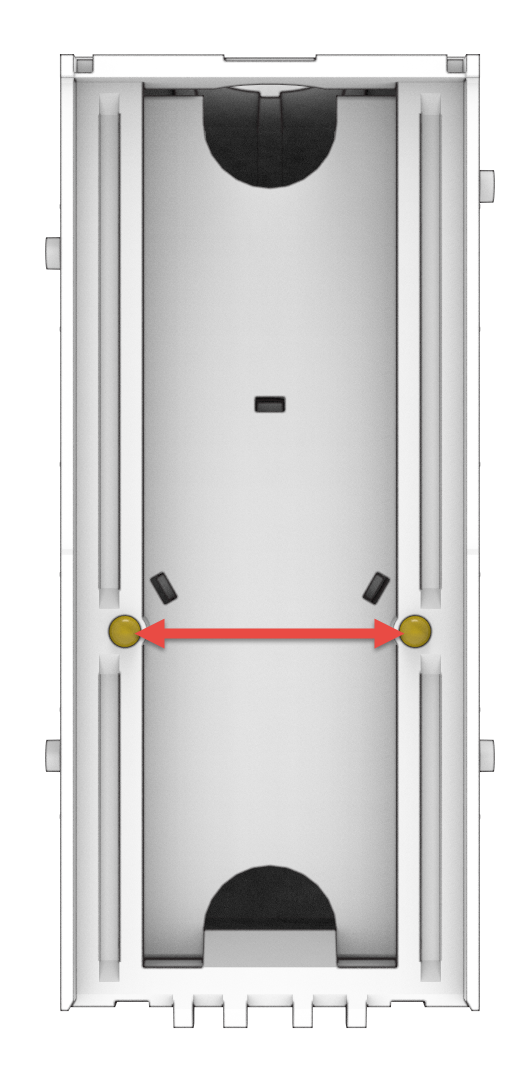
This kind of condition will create bill jams, possibly leaving the bottom of a bill slightly outside of the cash box and not fully stacked. Dampen a lint free cloth with water (only enough water to pick up dust) and run the cloth up and down over the bearings until all debris is cleared.
If it is found to have a depressed ball and was not solved by the cleaning it will need to be replaced as this can cause a jam in the cash box.
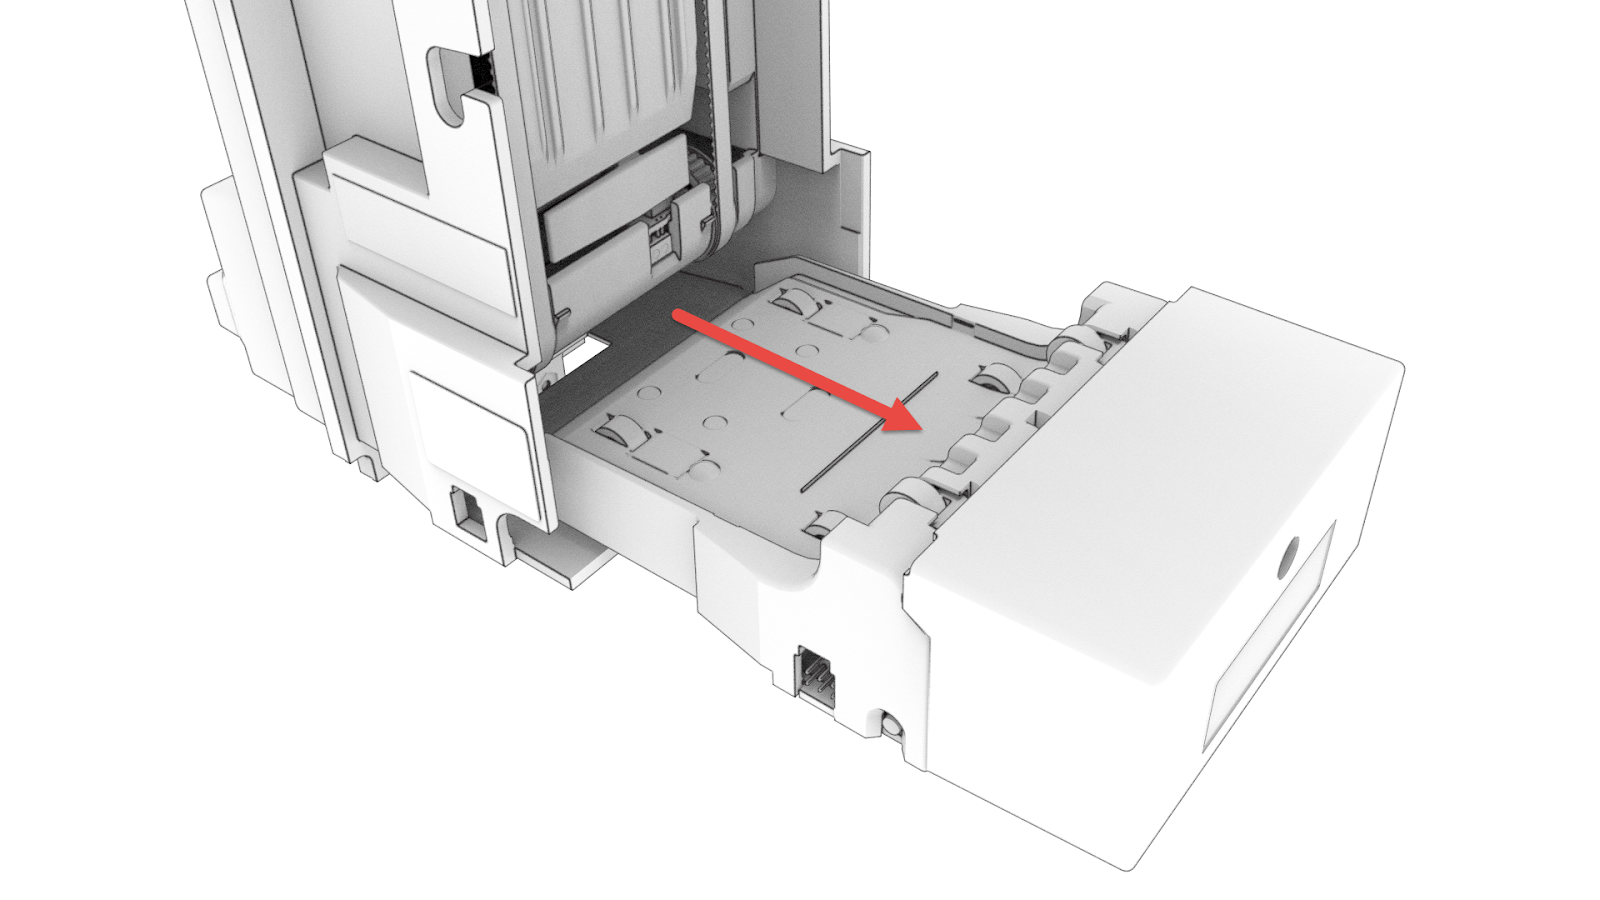
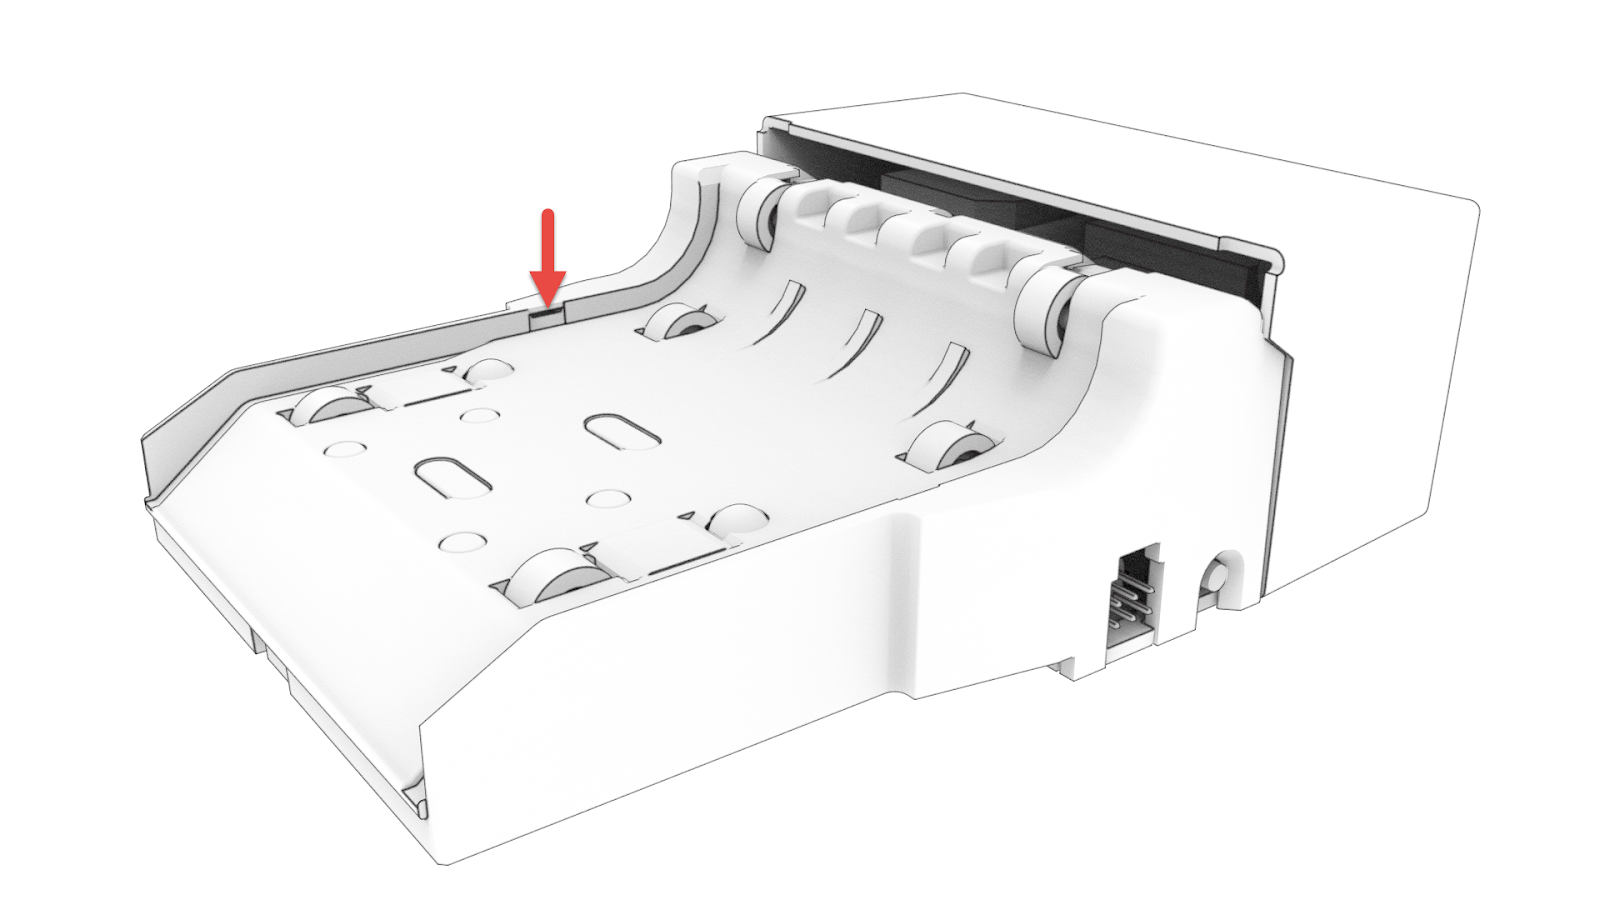
Step 3: Bill path plate cleaning
We recommend disconnecting all power and I/O connectors from the validator at this point. If any side connectors are still installed this could prevent you from fully removing the bottom plate without causing any damage to the validator.
No tools are required to pull the bill path plate out. There is a recessed latch that must be pushed in to release the plate. While pushing the latch in with your thumb, pull the plate straight back out of the main frame of the bill acceptor as seen in the image below.
Step 4: Once the plate is fully removed you will have full access to all the validation and side scan anti stringing lenses.
Inspect the plate for dust, dirt, smoke and debris. There are four round lenses and two oval lenses in the plate that must be cleaned. Dampen a lint free cloth with water, only enough water to pick up dust. Using the damp cloth wipe it over all lenses and roller until clean.
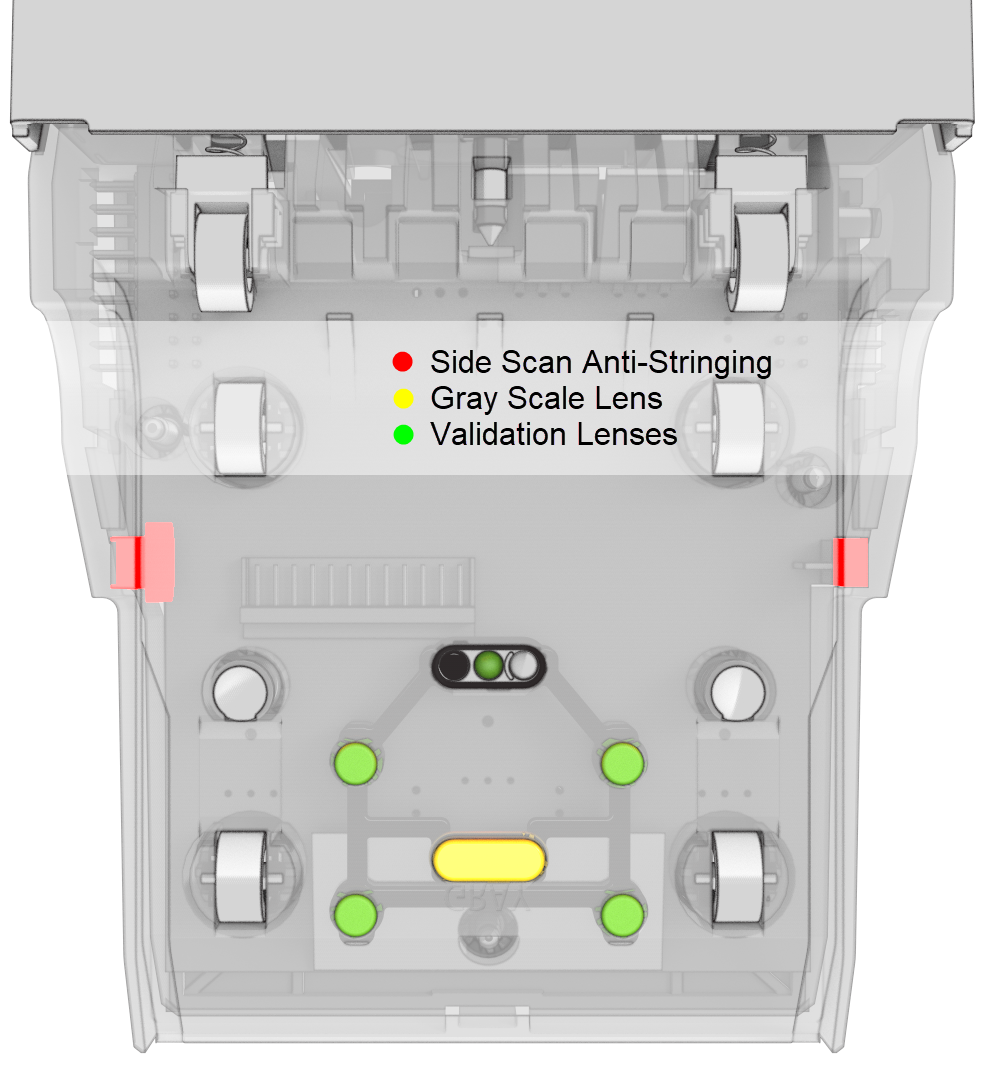
Step 5: Directly above the plate inside the validator, there is another set four round and oval lenses that beam back and forth to each other in the bill path plate as seen in the image below. Dampen a lint free cloth with water, only enough water to pick up dust and run the cloth over all lenses and rollers until clean.
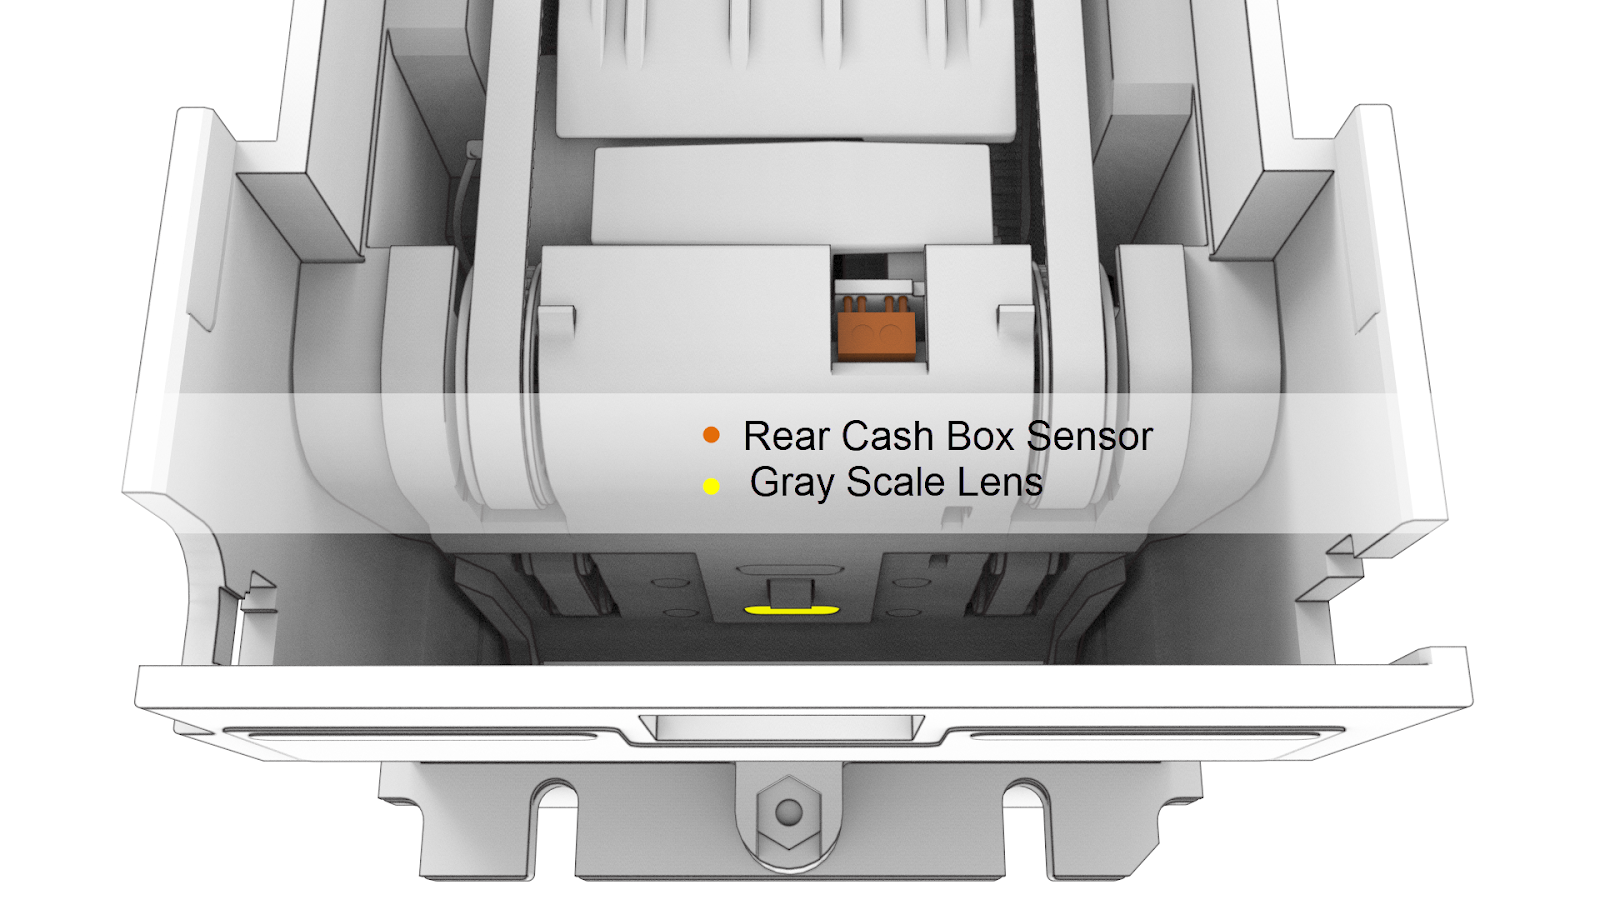
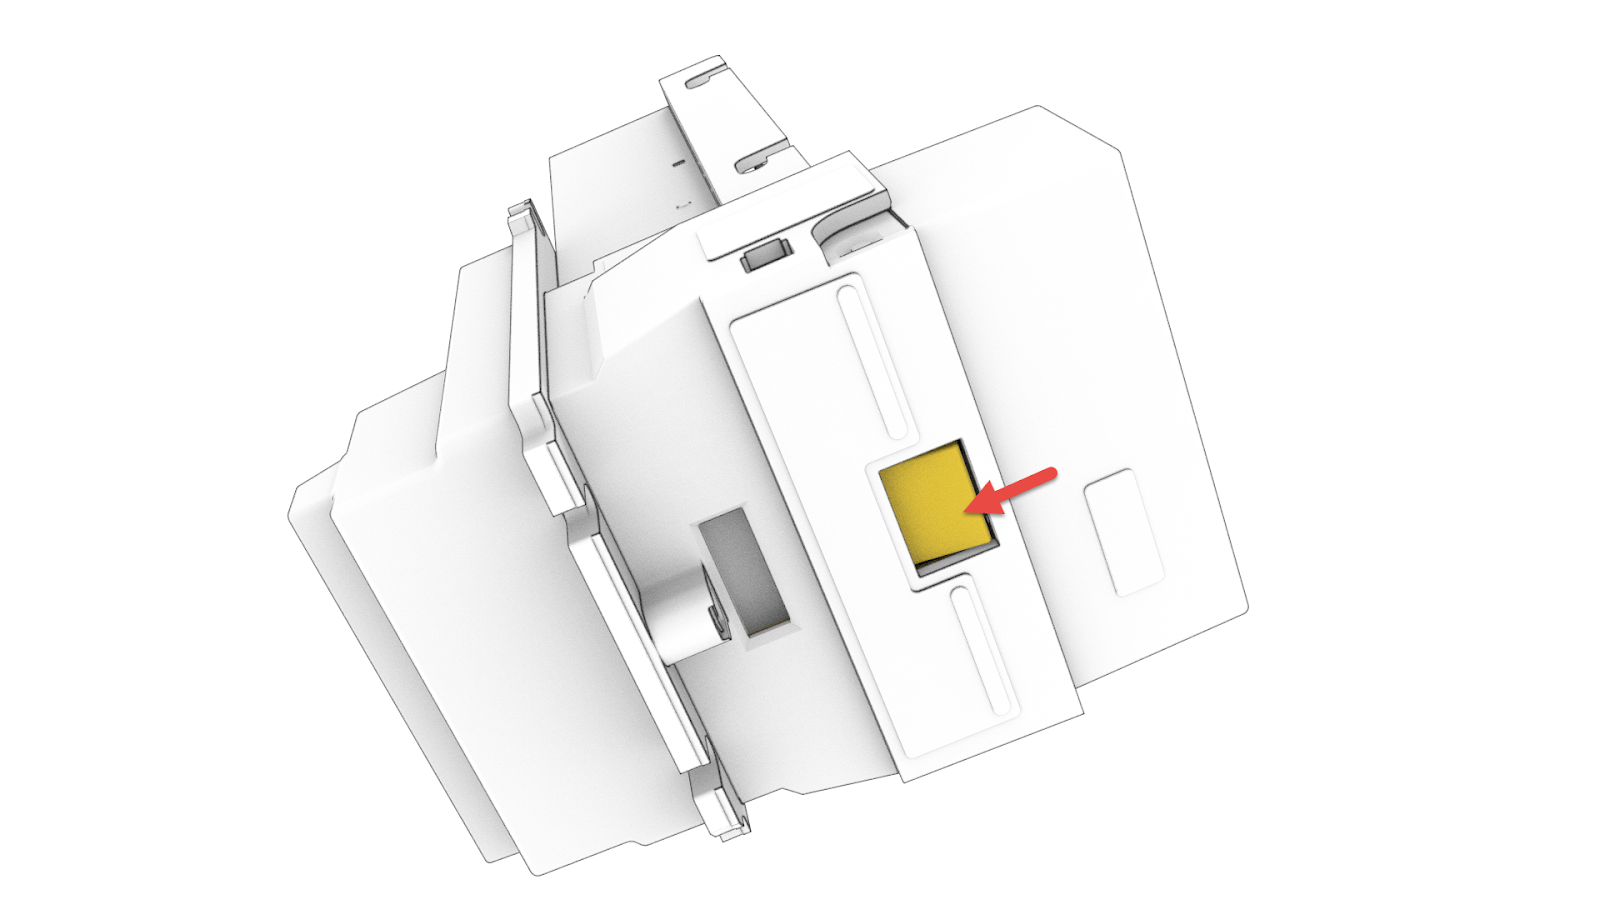
Of Special Note: Sidescan, grey lenses and cash box sensor
Use the images below to locate the side scan anti stringing, grey lenses and cash box sensor. Be sure to keep these lenses clean and debris free. If smoke or dirt builds up in these areas, bill acceptance and performance will lower and bill rejects will become more frequent. In certain cases water may not be enough to clean the surfaces. We recommend a 50/50 alcohol and water solution. This solution can also be used to clean the drive belts if they are extremely dirty. **NEVER USE OILS OR SILICON SPRAY ON THE ACCEPTOR**
**NEVER USE OILS OR SILICON SPRAY ON THE ACCEPTOR**
Related Articles
Phoenix Cleaning Instructions
CLEANING INSTRUCTIONS www.pyramidacceptors.com Rev. A 7/6/17 Document Overview The purpose for this document is to outline specific details needed for the proper completion of preventative maintenance cleaning. Scope The scope of this document is to ...Apex 7000 Firmware Update Instructions
APEX 7000 FIRMWARE UPDATE INSTRUCTIONS www.pyramidacceptors.com Rev. A 10/30/2024 Document Overview The purpose of this document is to outline specific details needed for proper firmware updates of an Apex stacker bill acceptor. This document should ...Apex 7000 Belt & Gear train replacement
BELT & GEAR TRAIN REPLACEMENT INSTRUCTIONS www.pyramidacceptors.com Rev. A 3/20/17 Document Overview The purpose for this document is to outline specific details needed for the proper completion of preventative maintenance belt & gear train ...Phoenix Firmware Update Instructions
PHOENIX FIRMWARE UPDATE INSTRUCTIONS www.pyramidacceptors.com Rev. A 02/06/2023 Document Overview The purpose of this document is to outline specific details needed for the proper completion of Firmware updating utilizing our Phoenix tools program. ...Phoenix / Banilla Game, Serial Printer Configuration Instructions
The Phoenix thermal printer is now fully compatible with all Banilla game platforms via serial communication. Our new SEN02 firmware gives you full serial compatibility with a few extra advantages. Larger bold text, shorter ticket length to conserve ...